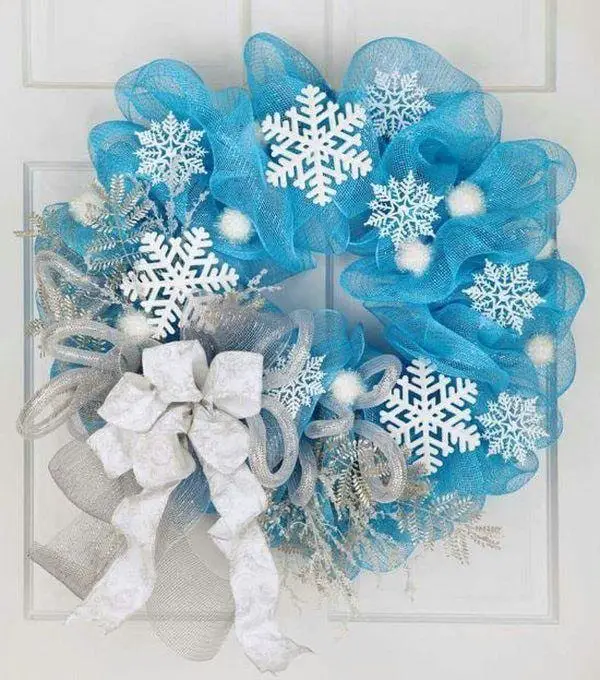
One of the most beautiful, flexible ribbons created from a mesh-like material is deco mesh. Because it’s bendy and offers a wide selection of colors, it is a trendy ribbon that is a useful material in different handicrafts. For example, deco mesh is used to design vibrant, seasonal wreaths. So, below are the three methods and step by step guides on wreath making with mesh.
Materials Needed:
- Wreath frame
- Rolls of mesh ribbon
- Chenille Stems
- Scissors
- Glue gun
- Craft glue
- Thin wire or floral wire
- Accessories or adornments
METHOD 1: Making One Color Mesh Wreath
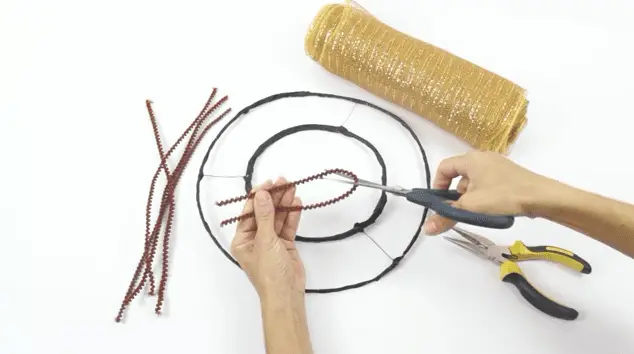
1) Start with the chenille stems. Cover the wreath frame with numerous chenille stems. Uniformly put the colorful chenille stems over the round wreath frame with a 1.5inches apart each.
Twist the chenille stems into the 1st or 2nd coil from the middle of the metal frame to bind. Securely twist them to keep in place. However, be sure to put with a minimum of 2 inches of free chenille stem on every end.
Utilize a shade that nearly evens your mesh ribbon color so that your chenille stems mix better.
The count of the chenille stems you use depends on the frame size you use.
Put aside your spare chenille stems, as you may need them later.
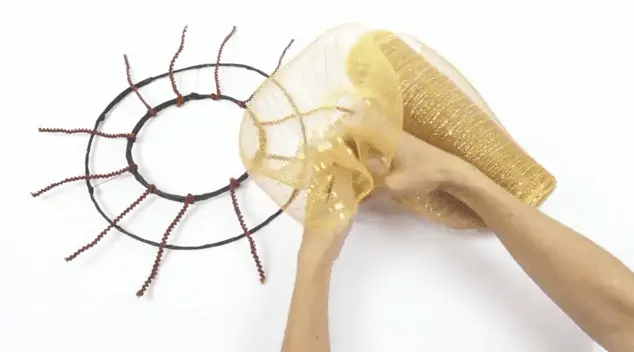
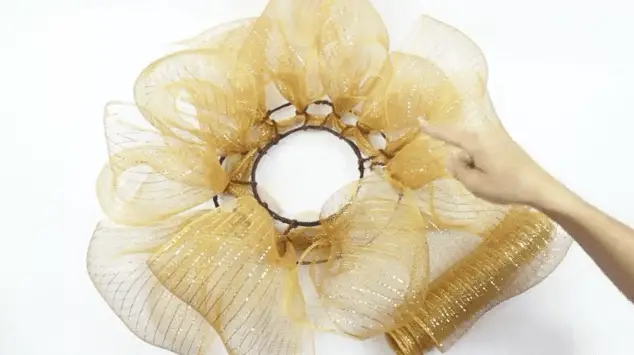
2) Bind the mesh decoration to your frame. Compress the first edge of the decoration and bind it to the wreath with one of the chenille stems. Put the compressed end in the middle of one pipe cleaner and curl the pipe cleaner toward the edge to keep it into position.
Use a big roll of large mesh ribbon. A 10-inch wreath ribbon would be great.
Sort the deco ribbon, so it covers the pipe cleaner, partly hiding it. The compressed ribbon end should stay across the structure. The decoration left should appear from the opposite direction, around the pipe neater knot, and at the edge. This must hide both the end and the chenille stems.
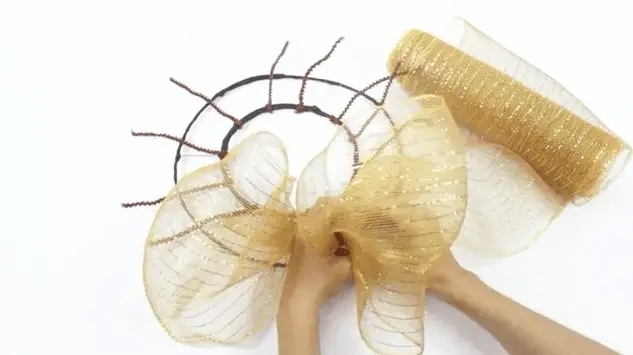
3) Attach the laurel wreath to the adjacent pipe cleaner. Collect 5 – 6 inches laurel wreath with your fingers, compressing off the dimension with fingers. Bind this pinched part to the center of the adjacent chenille stems and curl it over the laurel wreath to keep it.
This should create a small “balloon” of ribbon mesh. If the balloon appears flat or uneven, tenderly “foam it up” through twisting with your hands until the balloon looks even.
4) Link the laurel wreath to per pipe cleaner. Copy the same design to finish the wreath. Compress off 5 – 6 inches ribbon, connecting every width to the circlet by curling the adjacent consecutive pipe cleaner over the compressed part.
Chenille stems will be partly hidden by the balloons that are created with the decoration. If you like to hide them completely, cut them off with a wire cutter, leaving more to avoid the curled part from untangling.
Apply the same width of the laurel wreath for each part. Otherwise, the circlet will appear sloppy and uneven.
Complete your wreath by cropping the laurel wreath and attaching the crop edge to the first chenille stem. Twist the point of the ribbon mesh in itself to keep the right frame and to avoid raw ends from becoming visible.
5) Add another bed. The circlet can be just like that, however, if you like to make it appear fuller, connect another layer of similar mesh decoration to the structure.
Include more chenille stems, putting them in somewhat blank spaces made by the first bed. Position the chenille stems uniformly apart.
Adjust the second bed to the structure with a similar technique used to repair the first bed. Pinch even the width of the decoration and curl the added chenille stems over these compressed parts.
6) Attach other designs. Whatever the event is, you can add small designs, fabric flowers, feathers, miniature flags, or any other fashion adornments to the mesh circlet.
Use clear and quick drying glue to bind small designs such as feathers. These embellishments can be attached to the ribbon or the frame.
Using a glue gun helps attach the more massive designs like accessories to the metal frame. Don’t connect the designs to the decoration.
Attach your holiday decoration to a dark crown. Attach the big red bow to the lower center.
Design a Halloween circlet by putting black decorations, fake web, and plastic spiders to the circlet.
METHOD 2: Making Twisted Wreath Mesh
1) Twist your wreath mesh ribbon. Unfold a length of wreath mesh ribbon, twisting it until it creates a tube. The diameter should be 9-10 inches wide. You must cut the mesh to isolate the twist from the other spool.
You need about 72 separate curls of wreath mesh ribbon to make a full circlet. Or, if you want a less full circlet, use 36-54 coils.
At least, this design needs two spools of 21 inch by 10-yard mesh ribbon. You add more if you want more colors.
2) Create groups of mesh curls. Grip four curls of mesh ribbon together in the middle. Set them together with a pipe cleaner that equals one of the colors.
For a less full circlet, design groups with 2 – 3 curls of mesh.
Curl the pipe cleaner over the mesh curls enough to grip them altogether firmly. Put enough extra pipe cleaner at the edges to attach the decorations into the circlet.
3) Fix the first group. Attach the middle of the group to the inner ring of the structure by curling the pipe cleaner edges over the wire. Curl the chenille stems enough to grip the mesh in position.
Foam up the curls after the group is attached. A slight twist and place the coils so that partial face inward slantwise and partial face outward slantwise.
For this design, a 24-inch metal is the best choice.
4) Attach the remaining groups. Put the groups over the frame, leaving a uniform space apart and curling them in position using the left pipe cleaner edges.
The groups should be positioned a little over 1 inch separately from each other.
This helps put a tiny bit of “wiggle room” among the metal frame and the pipe cleaner. Thus, it allows you to slide the groups over and move them as you want. You can always twist it to become snugger after the group is all set as you like them to be.
Fix the groups to both the innermost and outside wires of the metal frame for a whole wreath.
5) Foam the curls. Twist and set the coils to make some face slantways inward and the other face slantways outward. The result must be a full wreath mesh with no blank space in the middle, and all wires should be hidden.
METHOD 3: Using Several Colors
1) Bind your first shade. Cover the edge of the wreath mesh ribbon over the frame, keeping it in position by covering a thin metal wire or floral wire over the side.
Crease the edge of the decoration below itself to cover the raw ends.
Use a wire that nearly matches the shade of your structure or among the wreath ribbons colors.
Use a 6-inch wreath mesh ribbon for a regular size wreath with vibrant colors.
2) Cover the first decoration over the metal frame. Cover the fabric over the frame. Bring the width over the initial point, around the upper of the framework, and then cover it over the frame again.
Each linking point must be about 2 – 3 inches apart. Leave a space consistently alone.
The dimension of the decoration used to spread the next linking point must be double the metal frame’s dimension reaching the linking point. Like for example, if the link apex is 2inches apart, use 4inches of decoration to reach that linking apex.
“Foam” up the wreath mesh decoration as you continue to make volume.
Bond the decoration to every linking point using a thin wire.
Complete the edge by taking the decoration to the initial point and link it to your first wire. Crease the side of the decoration below itself to conceal the raw end.
3) Add your next color. Place the next mesh ribbon to fill the remaining openings by the original decoration. By the time you’re done, the frame must be completely hidden.
The linking apex of the next decoration will fall under the “foamed up” or “ballooned” parts of the original decoration.
Space the next ribbon in parts that are uniform with the elements utilized for the original decoration.
Connect the next decoration to the frame by using the wire you used to connect the first mesh ribbon.
4) Knit in other shades. Use extra wreath mesh decoration to block in any gaps left on your circlet and 3 – 4 shades will look most beautiful, and use less or more, it depends on the stylish appearance you like.
Block the openings using a shade already utilized on your circlet.
Connect extra beds of decoration using a similar technique used to connect the first few beds.
5) Stick on other decorations. You need a glue gun to stick heavy accessories to the structure, such as centerpieces. Use a quick-drying glue to paste lighter adornments, like foam letters and feathers to the ribbon or structure itself.
