
Tatting is a methodology that is used to develop a chiffon category. You can start creating rings and locomotives with a lengthy tatting plunger or a shuttle using circuits and tangles—the more significant the proportion of threads, the sharper that loop. The magnitude of the comment stream also modifies the architecture size.
When selecting a thread, you need to remember the venture you are going to pursue. For instance, Easter motif ornamental cuts could only be used once per year, particularly in comparison to harnesses or handkerchiefs, which will be used and rinsed frequently. Tatting can then be used to develop many specific objects like doilies, bracelets, cufflinks, interior design, cuffs, and so on.
Here are the guidelines you need to remember and take into consideration as you start tattling lace:
- When you most need encouragement for tatting, there seem to be textbooks and videos that can be found on the web or in book shops. It is necessary to understand the standard colloquialisms used for reading the tatting directions, such as a request for starting sequence and guidelines for the narrow satin stitch.
- Tatting is beneficial for health. The repeated movement can behave as a remedy from discomfort and encourages easing pain, nausea, and lethargy. Needlework and quilting are some other carvings that provide significant benefits.
- Always consider your workspace. Because you choose not to use your fairly frequent cutting board (or thigh) to keep poking the catheters into it, you should have an acceptable work area. You might use a portion of fiberglasses like the one used for shipments or epoxy carpeting. The best approach is that even the plastic is quite dense. Your cushion must be thicker than your belt radius, also if you don’t insist on staying with it the whole way. Anything like polystyrene isn’t going to work for a month since it doesn’t have a gift to it but slightly falls apart.
- Prepare and consider your Fibers and garment: 100% fleece must have been the fibers used mostly for tattling needles. Those individual filaments can be used as ornamentation, as has been shown afterward. We were always being “finished” with our strands and fibers, either distorted or flipped or some such.
- This method employs threads that have not yet been decided to make into strands and synthetic fibers. The much more widely accepted one is known as rampaging. This is an excellent bit of cotton washed and ticketed. Ticketing lets all the filaments go one way. Now, it will only have to be woven for becoming fiber. However, in this “weak” state, we really want it.
Step by step guide for beginners and tips that you need to be aware of in tattling needles:
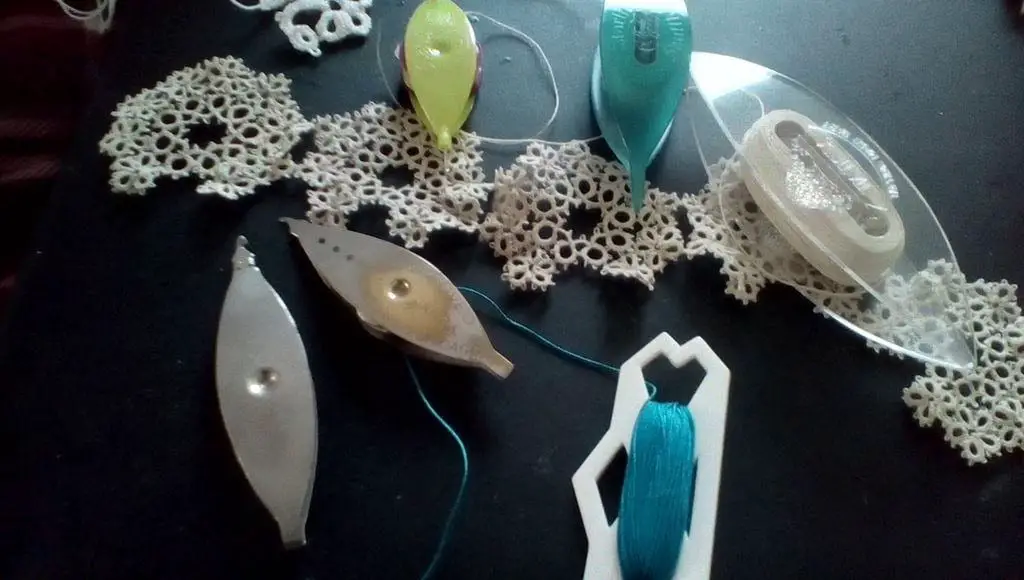
- Prepare Materials
- The string is held by the shuttle and continues to keep it from entangling. You can understand about a comparatively small plastic sheet by merely twisting the yarn around this one.
- The rope can be connected to the shuttle or not. Although many advertising shuttles also now emerge with an attached hook. Several shuttles I’ve seen on yet another end have such a claw hammer, but these aren’t my fave. The hanger tends to make pulling the yarn through your peckers easier. A small knitting loop is working.

- Pause for a while before you start
- Wind the yarn onto the shuttle. That may take some time or not. If you do that on your needle and thread, trying to fill a comparatively tiny shuttle with a narrow section on a retractable spool is incredibly easy. You can string it by myself, as well. Some transports have to be wrapped by the side, even though they have no interchangeable spools. Selectively select your post.
- Also, have something lighter if you’re a newbie — so you could see what was happening really. You can keep moving on to shorter yarn as you become more competent. The heavier the thread, the less you have to load onto your shuttle. That indicates you get to avoid it and load it up again.
- Understanding the basic Rings
- Keep the yarn, a few centimeters from the edge, in your marginalized side. Squeeze this same yarn among both your center thumb and forefinger just so that you can fasten the wool over your wrists and higher. Implement the ring by grabbing the loop shuttle end around your center index and middle fingers.
- The very first half chute will be done where the yarn runs through itself. The first few centimeters I stained with an indicator so you could inform which loop was encased all over my hand as well as which yarn was at the end of the shuttle.
- Use the shuttle loop to end up making a circuit. Keep your ‘pocket string’ so that around your pierced thumb/pointer finger, and your finger is spaced. That is where you’re going to work.
Conclusion
Although smaller fabrics were commonly used initially, more robust structures grew in popularity just after the late 19th century, which more often than not increased longevity but also improved to the design.
Tatted or shuttle chiffon makes it look sensitive; that being said, it’s long-lasting, evidencing its jeweled presence, and can survive the changing of the seasons. This tends to make tatted denture entirely appropriate for elegant trimming and beautiful application areas.
