Having a tattoo is an incredible method of showing the image or symbols which you like the most. A snap of how stylish you are will also be one of the points you’ve wanted to show. Be that as it may, be engraved in your skin, the difficulty to erase on it, or when such circumstances happen that you wanted to erase on it, then this is now the time where your problem occurs. The initial thing you can think of is why did I just not put a temporary one. Well, to swerve on the exit area of this, you need to inculcate yourself on what are the alternatives to be done to make this possible. Thus, one of the best ways is how to use and apply the idea of stencil tattoo in the body part, which you want the most.
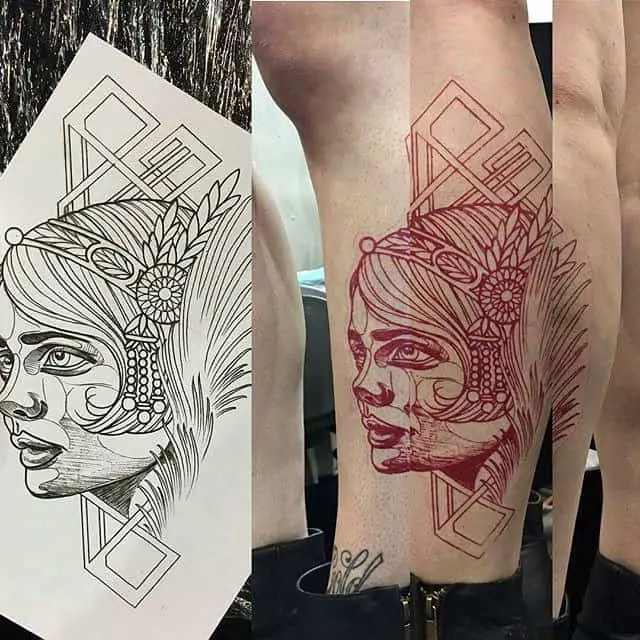
The idea of a tattoo stencil is when you precisely transfer the design to your body part or parts from the paper. It was carved. Doing the stencil tattoo at home is never a difficult task, but it requires you to do well or make sure your touches are well-refined. The exactness of doing it must always be on point, as a bad application of it will not result in your desired design. If you want to use your own design, then you can use this, and this is also a smart move as you can really place what you really want. If you like some designs on the internet, then you can have it as well or alter some of it just so it can always fit within your likings.
Do-it-Yourself Stencil Tattoos
The steps stipulated after this paragraph will tell you how to make a stencil tattoo ay home. Placing it perfectly by thorough implementation will result in perfect putting of the tattoo, or like the output of some professional tattoo artist will be at yours. You don’t need any advanced skincare routines before doing it as it you can easily place it in your skin. You just need to shave it and make sure that it is clean to let the dust particles not simmer in the tattoo.
However, let me give you the list of the materials before proceeding on how to make a stencil tattoo at home. Ensure that the materials on the list are all correct. The needed pens or inks can be purchased online, or you can find in the store that is not far from your home. You must note that it won’t result well when the right materials are not being followed and when the procedure is being not done properly. Here are the following materials which you should have:
- Wax Paper or Tracing Paper
- Masking Tape
- Dip Pen
- The tip of the pen must be fine
- Antibacterial Soap
- Stencil Fluid
- Razor
- Stick Deodorant
Here are the following steps on how to make a stencil tattoo at home.
- In the event that you would prefer not to continue plunging the pen into the liquid, you can likewise purchase exceptional liquid pens that are for stenciling.
- The first phase after gathering and having all the pieces of equipment is by channeling all your energy to practice the design in a paper that you wanted to put. If the chance that you already have your design being printed out, then you can definitely skip the first phase. However, the design must be in wax or tracing paper to make sure that you can easily see the design when carving on it.
- When you are content with the structure, it’s an ideal opportunity to move it to the tracing paper. Use some tapes to hold down the sides and to make sure that when tracing, there will be no changes in the placement of the design. Be mindful of the type of tapes you are using, as it may break some parts of the paper when you tried to remove it. The best tape you can use should be that easy to remove the tape.
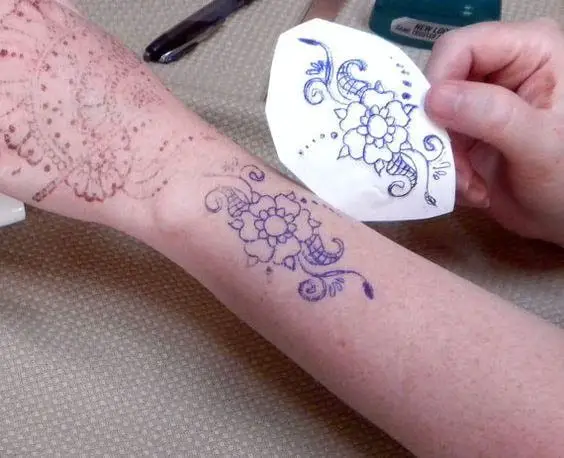
- When you are now down and done by tracing your design and removing the tape, then the next step is to put another clean tracing paper on the traced design of yours. Again, use the intended tape to place it well and start tracing it again. The second tracing must be done by using the stencil pen or your stencil fluid. Carefully trace it with no outside remarks on your design in order to make it look better and cleaner.
- If your design happens to flip, do not be anxious about it as it can still be solved. Henceforth, this part is where you need to check whether the design will be the same and not flipped when you are placing it. Always bear the idea that you need to reverse it to make sure that the image is correct. If you are confused about how to make sure it will be placed well, then get a flashlight and a glass. The image must be under or below the glass and then get another clean paper, and it must be placed at the top of your glass. By pointing the flashlight on it, you can now see the reversed design you’ve always wanted. At this point, you can trace the new reversed lines of your design.
- Always set the zone where you wanted to put the design on your body part and make sure that the paper will stick properly and neatly on to your skin. If there are some hairs on the part where you’ll put it, then you need to shave it; always make sure that it is free from long skin hairs. Using soap and cleansing it with hot water is the next step you should do after shaving or by means of cleaning the designated part. The antibacterial soap must be used as the last cleaning part of your skin and use some soft towel or clothing to dry on it. The last part is where you put the stencil lotion or deodorant on the area in which you will place the stencil tattoo.
- The second to the last phase you need to do is by cautiously applying the stencil and let the fluid part face on your bare skin. Pat smoothly the stencil and set the time by a minute or more to let the fluid sink within your skin. Be reminded that rubbing the stencil will blur or smirch on it, so do not ever rub on it.
- At the point when you are prepared and ready, slowly and carefully strip the tracing paper. The design which you always wanted will be left on your skin, carved on the part where you want it the most. Now, the last phase is to be prepared for the needle.
After all those efforts and phases you’ve followed, you are now done with your stencil tattoo. After reading the procedures, you may conclude that the steps are easy to do, and with just a thorough application of it, you will achieve what you want on it. I hope you’ve gained now the ways on how to make a stencil tattoo at home. I would place my best words and recognition to you once you are perfectly done with all the steps.