You can simulate the conventional shuttle tatting by using the doll needle or tatting needle instead of the tatting shuttle. There are 2 basic tactics one can use in needle tatting. The first one is called disseminated technique in which a dual thread passes over the stitches. Your outcome is the same as shuttle tattling, but it is a bit looser and thicker. The other tactic is much more similar to shuttle tatting as one thread passes over the stitches.
In needle tatting, the stitches are created on the special needle and will be pushed off, forming chains and rings. Tatting needles can come in different sizes that range from extremely thick for heavier threads and yarns to something thinner for a more delicate lacing project.
Why Do People Love Needle Tatting?
Needle Tatting is as popular as shuttle tatting because it is quick and easy. A lot of people find it easy to understand and do. The thread’s movement on the needle is more intuitive for many compared to the slide and slip of the tatting shuttle. Also, it is less painful and tiring to do than shuttle tatting. Plus, you can easily correct your mistakes.
Steps in Doing Needle Tatting
If you already have the needles and threads, then prepare and get started with these steps:
· Make a Double Stitch
Tatting consists of 1 stitch, so a double stitch is set apart by picots. The stitch should be used to make chains and rings that must be the key structure of your tatting. Insert the thread to the needle, giving at least a 16-inch long tail. Touch the working yarn from the ball close to the tip of the needle using your index finger on your right hand. Release the yarn once the first double stitch has been made.
· Work on the 1st Half of Your Double Stitch
While you hang on to the yarn with your other 3 fingers, start wrapping it clockwise all over your index finger (on its back). Glide the needle underneath the yarn to your fingertip. Remove your finger then tighten the hoop on the needle. It will be the 1st half of your double stitch.
· Work on the 2nd Half of Your Double Stitch
For the 2nd half of your double stitch, you do the other way. Wrap the yarn on your index finger in a counter-clockwise direction, glide the needle underneath the yarn to your fingertip. Glide the ring beside the 1st loop. Tighten the 2nd loop.
· Make a Picot
After completing the double stitch, start making the 1st half of the succeeding double stitch. Instead of gliding the stitch beside the first one, hold the ring at around a half-inch apart while creating the 2nd half of your double stitch. Glide the finished double stitch close to the first double stitch. The tiny hoop you made between them is the one called a picot.
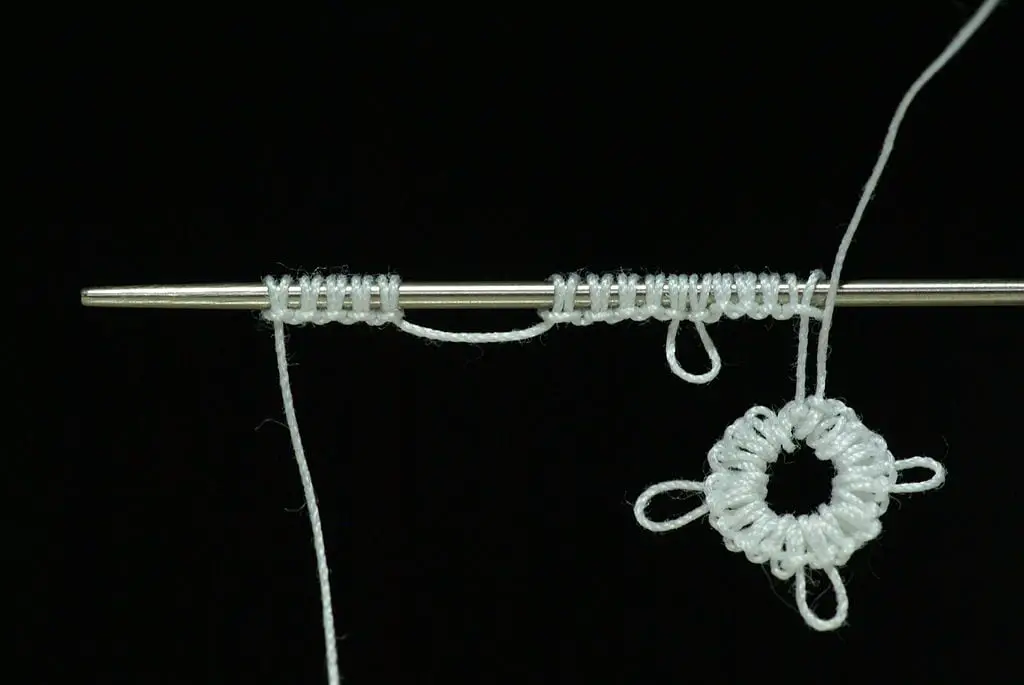
· Make a Ring
Make any form of the double stitch with more picots. It depends on what you want to do (a flower pendant, for instance). Create a ring that consists of 6 double stitches with a lengthy picot measuring 1 inch. After that, make an additional 6 double stitches.
Glide the double stitch off your needle on the thread inserted in the needle’s eye. Keep the ring forming on the tip from closing by putting your finger in the hoop. Bring the needle’s tip over the ring and pull it closed. It is called “close the ring,” as stated in the written patterns. The final step will be turning the ring through and tying the knot on the top. It is called RW or reverse work.
· Make a Chain
Put the needle in the final knot created on the loop. The chain is only made after the ring. Make several double stitches and picots. The number will still depend on what you want to come up with. Glide the double stitch off your need on the yarn in the needle’s eye. Pull your thread so that your chain will lie right beside the ring.
Just like the ring, you should turn over the chain and tie the knot (reverse work). Occasionally, the chain or ring is not reversed after closing, but the knot will still be tied. The left and right thread don’t change the place if you tie the knot in this manner.
Your Takeaway
If knitting has been your favorite pastime, then you will enjoy needle tatting for sure. Perhaps, you find the steps above quite hard to follow. Well, there’s a tutorial below. It is a comprehensive set of steps that will walk you through the basic techniques for needle tatting. This video tutorial will help you follow every step provided above easier. You will learn better how to make rings, double stitches, and picots.
