One of the most creative crafts that can also be used as a form of livelihood is basket weaving, especially in rural areas where raw materials are most accessible. As an ancient craft, they weave baskets to serve as storage for the animals that they hunted around 4000 years ago. Apart from being just storage, they use it to transport their goods and materials too. Even though baskets are completely vintage by now, there are still a large number of people who prefer hand-woven crafts.
Reaching this post means you are more than interested in trying basket weaving. The twist is the main medium to be used grass. The grass is one of the most versatile materials in the field of handcrafted products. With the properties they uphold, you would be surprised by what grass can do. You might have a lot of questions in mind by now, but trust us, and we’ll give you the best guide on how to basket weave with grass.
What is Basket Weaving?
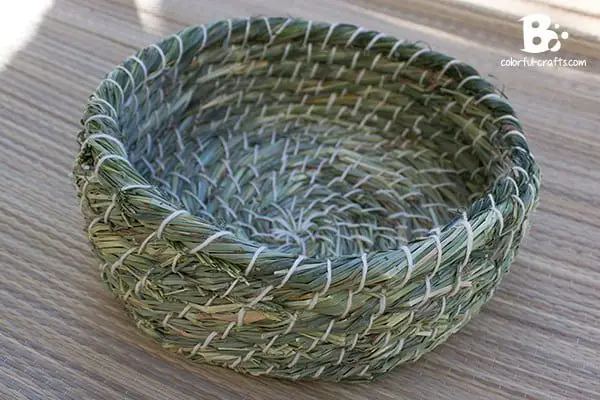
A weaved basket is more than just a handicraft. As one of the oldest art forms produced by humankind, baskets play significance through being marked as an icon for both culture and ethnicity. They exhibit symbolism, religion, motif, and even myths. Now, in the 22nd century, there is no doubt that the use of baskets is still present, and its features are still preserved, bringing that garden-fresh look harvesting fruits and vegetables.
Basket weaving can be done with different raw materials depending on their availability as long as they can withstand both weight and water. In modern days, they have found ways on how to treat the raw material for it to last longer. With the help of varnish, the color is enhanced, and the material is protected that will help in withstanding both weight and water, which makes the use of basket more durable.
What are the Tools and Materials Needed?
As one of the forms of livelihood, basket weaving with grass is actually relatively cheaper than using other materials. All you need is to invest in the tools that can be used in the long run. Besides, we want tools that can withstand the hard and sharp properties of grass. It’s a one-time investment that can be used for a long span of time. Below are the five must-haves for every beginner in basket weaving grass.
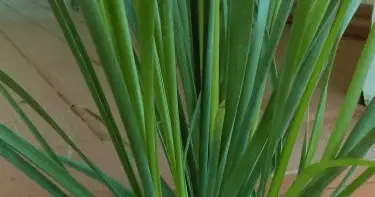
Grass
The grass will be used as the primary medium of the basket. You can use either raw or dried grass depending on your preference as long as it’s not too dry because it will eventually turn brittle and prone to breakage.
Yarn
The yarn is optional. You can use whatever binding material that you want as long as they can pull the basket together and keep the seams tight. Some weavers use grass as well to bind. But for beginners, it would be best to start with yarn first because they are easier to get a grip of.
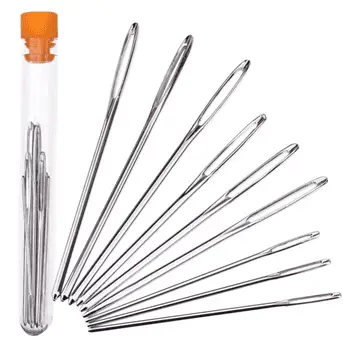
Bodkin
Bodkins are large needles in which the tip is not that pointed at all. They are used to bind the coil together, inserting it in between the strands of the coil.
Scissors
Use scissors to cut off the excess edges or cut the grass depending on your desired length. These work better than cutting them with your fingers because it can easily strain them.
Round-Nose Pliers
The round-nose pliers are for the bending and cutting of the hard coil parts. This happens when you use dried grass instead of fresh ones. They tend to be hard, chunky, and brittle at the same time, making it harder to form.
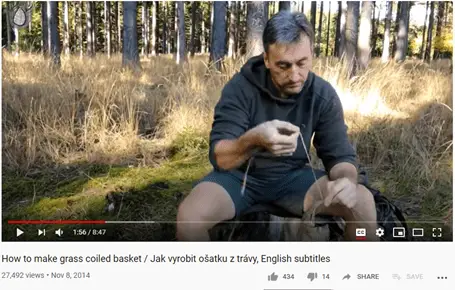
9 Steps on How to Weave a Basket Using Grass
Weaving a basket can be tedious for some, especially when you have very limited knowledge of how to. In reality, the process is just repetitive that it can easily get ahold of. To further assist you in this work of crafts, here are nine steps on how to weave a basket using grass.
Step 1:
Gather your materials such as the grass, yarn, bodkin, scissors, and red-noise pliers. It would be best to gather your materials to limit your movement to one table and having everything at an arm’s length.
Step 2:
Start doing your coil as soon as you have gathered all the needed materials. For beginners, you can start with a coil in around 3 to 4millimeters thick.
Step 3:
Grab a handful of grass depending on how thick you would want it to be. Bend it in the end that it will create a hook. Then you can use your yarn or whatever binding material you prefer to wrap around the coil. Making it sturdy and durable even when bent.
Step 4:
As much as possible, do not congest the coil too much. Don’t make it too loose because the durability of the basket will be compromised. At the same time, don’t make it too tight because it will require you to use more strands of grass, and it will be harder to bend during the weaving process.
Step 5:
Right after you have perfected the coil, you can now start working on the base of the basket. The hook-like appearance that you have made earlier is where you will start. Begin to bend the coil around the initial hook. Tighten the circling in order to make it look as tidy as possible.
Step 6:
Using the binding material, insert it in the center of the base and pull it tightly up to the outermost part of the coil. This will serve as the double wrap securing the weave both on the outside and the inside. Since you are doing the base of the basket, it must be really tough as much as possible, considering that this is the one carrying the weight of the load.
Step 7:
As you continue the spiral for the base, you will eventually notice that you are running out of the coil. The best thing to do is to grab a handful of grass and make sure it is as thick as the amount of grass you applied in the first part. It’s as if you’re extending hair, yet you’re doing it with grass. As soon as you have gotten the right handful of grass, make it compact and wrap the binding material around it.
Step 8:
The process of weaving a basket is repetitive. You will just have to repeat it until you have formed the base, and you have reached the right height of the basket. That’s just about it. If you think that you have formed the right width for the base, start elevating the circling of the coil and work on the height of the walls of the basket.
Step 9:
Step 9 is optional. Use varnish and paint the inside and outside parts of the basket. It will give a brighter brown color and shiny finish to the basket. Leave it under the sun for around 2 to hours per side before using it.
Conclusion
In conclusion, making a weaved basket is such a wonderful handicraft to start with, especially if you’re up for different creations with a personal touch. More than just a hobby, a weaved grass basket is a great start for those who want to make it as a form of livelihood. This is surely something you’ll enjoy doing alone or with the kids. It’s easy to do, and there are a lot of areas that you can experiment in.
