Basket weaving is one of the oldest crafts that have existed since the beginning of human civilization. Traces of baskets have been found in Egyptian pyramids, dating back to at least 2500 BC. Baskets were used as containers for storing and transporting everything imaginable – food, water, and clothing. The craft of basket weaving was passed onto the different parts of the world when people traded goods with one another. This explains how so many Asian weaving techniques are carried over in European and American baskets.
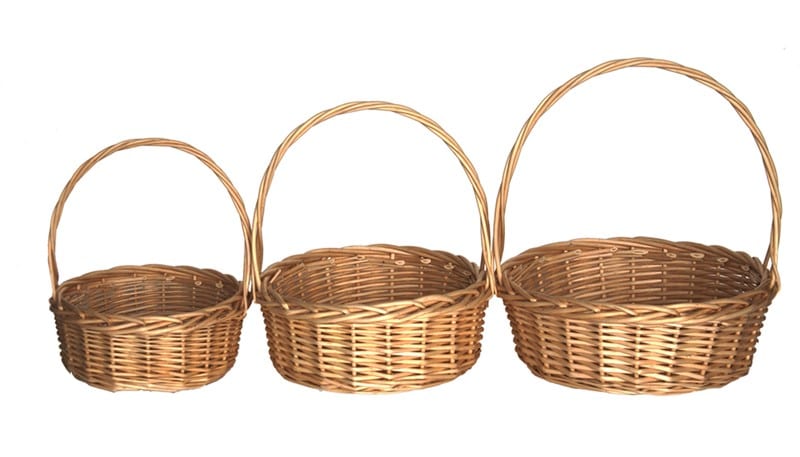
In modern society, basket weaving, or basket making, continues to be an important aspect of several cultures around the world. There is a multitude of uses for baskets, from adding charm to any home to serving as traps for catching fish and other small animals.
What is Basket Weaving?
Basket weaving is described as the process of sewing materials over and under each other to create a shape. Several types of natural fibers that can be used to weave a basket. This includes animal hair, pine, bamboo, grasses, vines, reeds, and willow. All these materials are pliable, which means that they will bend and form a shape. However, innovative basket weavers are experimenting with a new wave of fibers, which includes aluminum, plastics, and even newspapers.
There are four types of basketry methods: coiling, plaiting, twining, and wicker. In this article, we will focus on twicker, which is done with traditional materials like willow, among many others.
Basket Weaving with Willow
Selection and Preparation
Willow basket weaving uses round “basket willow” rods harvested from their 1st year of growth. Generally, these branches have green-colored barks that peel easily. They are also more flexible and supple than when they reach their 2nd year and so on. In their 3rd year, these rods will become strong enough to be used in furniture making. By their 4th year, they will grow even stronger and will be large enough to be used as fence posts or fuel logs.
The term “basket willow” often refers to a group of willow tree species that are preferred by many basket weavers around the world. Although most of the willow tree species have long, slender branches that can easily be used for woven baskets, this particular group is pruned in such a way that stimulates the production of long, thin, straight, and unbranched rods.
Good quality willow rods have a constant diameter along their length. They should be long, flexible, and free of branching. Discard rods that show any black spots as these indicate disease. These marks are prone to breaking as you weave.
It is important to buy or use rods that have already been cut and dried. Rods taken straight off from the tree will still shrink once it dries. And if used in weaving a basket, this will cause your end product to become distorted and left with gaping holes. This is why it is always best to work with willow rods that have been dried, re-soaked, and, basically, pre-shrunk.
If you are using your own rods, it is important to know how to soak and dry them thoroughly to make them easy to manipulate and prevent snapping or cracking. Soak your newly harvested rods for half an hour or so in hot tap water. You can lay a heavy object, like a brick, on top of the bundles to immerse them. After this, allow them to dry by wrapping them up in a damp cloth and leaving them under a hedge for approximately twenty-four hours. Next, bring them out for their re-soak. Extra dampening is necessary to further enhance the pliability of your rods and ensure that they are bendy enough for weaving.
After their second 30-minute bath, the rods will have to be wrapped in damp towels again and left for an hour. This end process, before the rods are ready to weave, is called mellowing. This also ensures that moisture is evenly distributed throughout the rods to prevent brittleness.
Weaving Process
What You Will Need:
- Scissors, sharp knife, and side cutters
- Round-nosed pliers
- Bodkin or knitting needle
- Clothespin
- Measuring tape
What You Need to Do:
Start with the base. Traditional basket weaving will use the same material throughout, including the base. Depending on what shape you are going for, whether it is going to be around the basket, an oval one, or a square one, there are various ways of starting a base.
Take six of the thickest rods to use as your base sticks. You will see that the rods are thicker at their base end, or otherwise known as their butts. On the other hand, the topmost, thin ends of the rods are called the tips. From the ends, cut a length of 30 cm long. Take three of the sticks and create a split at their center using a sharp knife. The split or hole needs to be at least 5 cm long. Thread the other three sticks through the center of the split sticks, forming a cross called a “slath.”
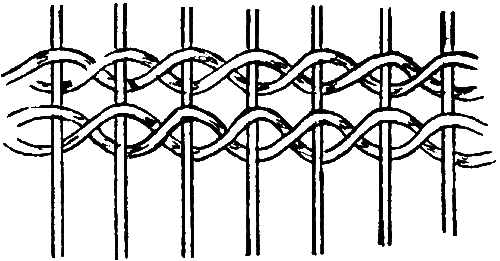
Next, take two of your thinnest rod tips to use as weavers. Weave the base by using a method called “pairing.” To do this, start by inserting the tips into the split of the slath and position them next to the rods. Bring one end of the tip over an arm of the slath, and the other end down behind the same arm. Do the same across the other arms of the slath for two more rounds. Make sure that the weavers are pulled in tightly as you go.
The third round of weave will be done between each slath sticks, instead of the full slath arms. Bend each stick open and weave your weavers between them, pulling them firmly with every move and as tight as you possibly can. Make sure that the spaces in between each round is even and level like a flat disk. Continue to weave until you have a base for your basket. In this article, we are creating a basket with a base of 22 cm wide.
In order to splice in new weavers, simply add a new weaver alongside the old one, leaving about 10 cm of a stub, and continue weaving. The protruding stubs will have to be trimmed once the base has been completed.
To lock your base, simply thread the last weaver in between the weavers of the previous row.
You can aim for two types of bases: A flat base or a crowned base. A crowned base has a slightly concave underside, that is known to add strength to the finished product. In order to achieve the domed form, simply push the center of the basket when the woven area reaches about eight cm wide. Repeat this procedure as you continue to work through your base, pushing after each row or two.
To start weaving the sides of your basket, begin by using your bodkin to push deep into the sides of the main rods to create a small gap. Next, insert new rods, which have been “slyped” at the end, into the weave alongside each main rod. Slyped means cutting the ends diagonally using a sharp pair of scissors or knife to give it a long sharped point. Turn these new rods vertically. These will give you the “side stakes” needed to start weaving. Remember to choose rods that are thicker than your weaving material.
Once the side stakes have been held up, tie them together with a hoop to keep them in place. Make sure they are not being held in a lopsided or unbalanced manner. Trim any protruding base rods, cutting their ends further back than the turned-up side stakes
To transition between the base and the side, we use a weaving method called “waling,” which involves three rods to secure the stakes upright and space them more evenly. To begin work, lay in three rods of similar length and insert them in adjoining spaces. Take the left-most rod, carry it over the others, behind the stake of the right-hand rod, and out to the front again. Use the same process on the next left-most rod; over the others, behind the next and out to the front. This stroke is repeated throughout while making sure to always take the left-hand rod each time. When you reach the end of the rods, leave some length on the outside and simply insert new ones alongside the old ones. Cut off the protruding ends when you reach about half of the basket.
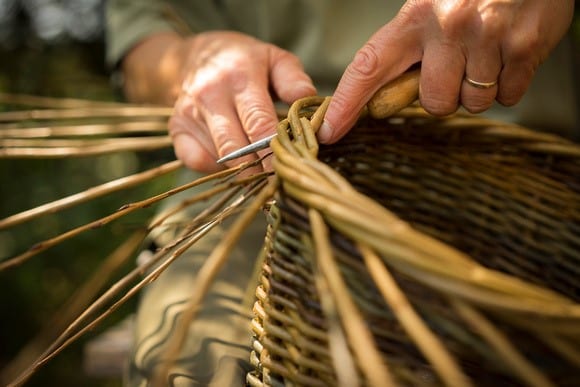
Finally, the borders. Borders are the most noticeable features of basketry. They need to look clean and secure. There are many methods of completing the border of the basket, but in this article, we will be starting with the simplest one.
Starting anywhere on top of the basket, use your bodkin to kink all the stakes to a right angle of at least 1 cm higher than the top of the weave. The kink must be made at the same height across all the rods. Working to the right, fold one rod down behind two upright stakes, in front of the next, then behind the fourth stake. Repeat this until you have only three stakes remaining upright. Using the same pattern, thread the last remaining stakes under the already woven stakes. As a finishing touch, trim all the ends of any excess rod by making slanted cuts.
We have just covered the simplest method of creating your own willow basket from start to finish. If you are not satisfied with the shape of your first basket, that is okay as you can always try again and eventually perfect this old-age craft. It is a great hobby that anyone can start. All you need are some naturally grown materials and some tools.